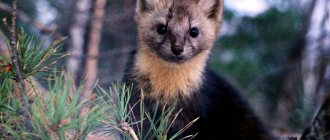
Soft and cozy hats made of mink fluff – you just want to pick up the knitting needles and knit them as soon as possible. Let's look at several styles today so that you can choose. In addition, it matters how many loops you put on the hat. Each craftswoman has her own knitting style. Some knit loosely, others tightly. Therefore, I have chosen several ways to knit mink hats so that you can somehow adapt and knit your ideal model.
From mink yarn with an elastic band 1 on 1
My favorite knitting pattern for a hat is 1 by 1 rib. And if it is also knitted from mink yarn, the result is simply brilliant! The slightly elongated crown gives the model a stylish and fashionable look. For an average women's hat size you will need: yarn with mink fluff (350m/50g) – 100 grams; knitting needles on fishing line No. 4.5.
Density: 20 p. = 10 cm.
Description of knitting a hat made of mink fluff:
The work is done using 4 main mink threads and 2 stabilizing threads (included with the skein). Cast on 74 sts + 1 st to join into a circle. Knit with an elastic band 1 by 1 approximately 30 cm (= 54 r.). To decrease, transfer stitches onto two long double needles (37 stitches each). Mark the knit stitch in the center of both needles with markers. Continuing to knit the elastic, in the next row, without knitting 3 loops to the marker, we knit them together purlwise with a slant to the right. Next we knit central. knit and 3 stitches together, purl with a slant to the left. We repeat the same on the other knitting needle. Make such decreases in every second row until 12 stitches remain on the cap. We pull them together and secure the end of the thread.
Author: @lena_knits
With an impressive design.
Fur knitting master class
This master class is suitable for those needlewomen who have old fur items. It’s a shame to throw them away, but there’s nowhere to dispose of them. If you have worn fur hats and collars, we suggest you knit them into a completely new product using step-by-step photos or using video material.
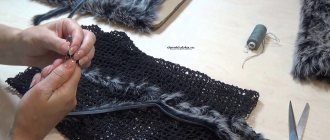
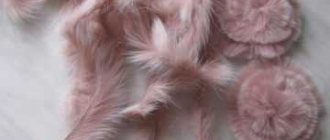
First of all, before starting the master class, you need to prepare the fur. Open the required cut and clean the underside of it with a brush. The brush will help get rid of old glue and dust. Use a comb to comb the fur, removing pellets and other debris.
Using a ruler and marker, draw even stripes on the wrong side, as shown in the photo. It is necessary to cut the fur by weight, so as not to spoil it with a knife. Or place the product on a stool that has a hole in the center. The knife should constantly touch this hole.
The main part or lining can be knitted or crocheted. It is best to use wool yarn for this.
If you use knitting needles, then you need to knit an elastic pattern with holes. For the hook, make columns with double crochets and air loops between them. You don't need to make too small holes, otherwise the fur strip simply won't fit through.
Align the pieces during the working process and shake off any loose hair. Take one piece and thread it through the hole, then do the same with the other strip. The ends of the strips must be sewn from the inside with a thin needle but strong threads. The photo shows how the product should look from the inside out.
When you have completely filled the base, turn the product right side out, shake it, and comb the fur with a comb. The photo shows what should happen in the end. Thanks to this technique, you can knit or crochet anything. This concludes the master class. By watching the video material that will be in the article, you can clearly see the entire working process of fur knitting.
Simple hat made from mink down with pearl pattern
Mink yarn is great for knitting berets for women. We will use regular pearl knitting.
Prepare: mink fluff yarn (350m/50g) – consumption approximately 100-125 grams (in 4 folds + 2 additional stitches); circular knitting needles No. 4.5 and No. 5.5.
Knitting pattern for a women's hat made of mink fluff:
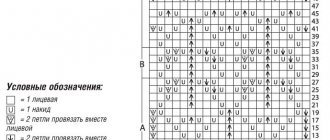
On the sp. in a smaller size, cast on 82 stitches to the required fold number for the hat and 1 stitch to discreetly join into a circle. Knit 9 r. rubber band one on one. Change the size of the tool and make increases for volume: *purl, knit, increase purl. p., knits., purl., adding knits. p.* - and so on until the last loop in the row (= 123 p.). From the 11th to the 49th r. do the work with a pearl pattern (above the front stitch - purl stitch, over the back stitch - knit stitch). From 50th r. We begin to make decreases: * 3 sts (I, L, I) together purl, 1 knit*, – until the last 3 sts in the row, 3 vm. purl (=61 p.). 51 and 52 r - according to the drawing. 53 r.: *1 knits., 3 sts. purl* – to the end of p, at the end of knit 1 (= 31 p.). 54 and 55 rubles: according to the pattern. RUR 56: *3 vm. purl, knit 1*, at the end of 3 r. purl (=15 p.). 57 and 58 rubles: according to the drawing. RUR 59: *1 person, 3 vm. purl*, 2 p. purl. (=8 p.). To make a ponytail on the hat, switch to double needles. Divide the stitches onto two needles, 4 stitches each. and knit straight 3/4 r. (optional). Pull the loops and tuck in the ponytail.
Based on materials from @ziliko_vyazanie
Interesting: read a large collection of mohair hats here.
With one braid.
History of the headdress
Ushanka appeared many centuries ago. The fur hat has changed appearance many times. The headdress acquired its final form at the beginning of the last century, becoming part of the army paraphernalia. The headphones were held with ties under the chin or attached to the top of the head.
In perestroika times, the earflap hat became the subject of a profitable farce. Foreigners willingly purchased it or exchanged it for the things they brought. This hat has been given the title of traditional Russian headdress.
The hat is very popular among young people, as it provides excellent protection in winter frosts. Headphones allow this fashion accessory to convey the mood of the owner. Wanting to tease others, some do not tie them, leaving them to tremble as they move.
Women's earflaps look very cute
Tourists still buy the headdress as a souvenir to this day. Moreover, modern models are presented not only in the classic version with fur. There are many options for knitted and knitted hats with earflaps.
Reversible warm hat
For the winter season, a double hat knitted from yarn with long-pile mink fluff is more suitable. In this accessory you can hide from frost and wind. The length of the hat is 28 cm. To make a more elongated shape of the hat, knit a larger number of stockinette stitches before you start decreasing.
How to tie - the order of work.
Calculation of knitting for a head volume of 55 cm and a density of 25 p. = 10 cm.
On the auxiliary thread, cast on sp. No. 3 120 p. in 3 threads + 2 auxiliary. n., knit 120p with burgundy thread. and close the work in a circle. Knit 10 r., then change the knitting needles to No. 3.5 and knit 61 r. Divide the stitches into 4 parts, hang markers and start making decreases. 1 rub. with decreases: *knit 1, 2 sts. knit with a slant to the right, then all knits. p. without knitting 2 p. to the marker, 2 p. vm. persons with switch to the left* – another 3 rubles. Next 5 p. do it without any decreases. Then a row with decreases, another 4 rubles. straight, 1 rub. with a decrease, 3 rubles. straight, 1 rub. with a decrease, 2 rubles. straight, 1 rub. with decrease, 1 rub. straight, 1 rub. with decrease Pull and strengthen the remaining loops.
Let's move on to knitting the lining of the hat. Pull out the auxiliary thread and lift the loops onto knitting needles No. 3. Repeat the work pattern similar to the outside of the hat in a contrasting color, but 4 p. less in height (not 61 rubles, but 56).
@love_handmade_knit
Interesting: Read here which stole to choose for knitting.
Variety of knitted patterns
Knitted hats with earflaps can look completely different. Their appearance and complexity of execution depend only on the imagination of the craftswoman and her skills.
Knitting patterns for women can vary greatly
Who is the headdress suitable for?
A hat with earflaps made of yarn gives the wearer a mischievous, but at the same time very feminine look. This headdress can be worn when going skiing or going to a social event. The image it creates largely depends on the color and texture of the chosen threads, as well as on the shape of the cap itself.
Brighter and more saturated shades are suitable for very young girls, giving them a playful and funny look. In this case, the model can be complemented with pompoms or tassels to emphasize the character. Decorations made of rhinestones and beads will make the hat glamorous and memorable.
Girls a little older can opt for classic styles and natural colors. In this case, a women's earflap hat made with knitting needles will turn out to be very elegant and will add a special charm. Pure natural colors will allow you to fit such a headdress into any look.
Models for women with a romantic mood can be decorated with flowers or mink pompoms
Methods of execution
There are several basic techniques that can be used to make knitting needles for a woman:
- based on stockinette or satin stitch, suitable for beginners;
- relief, for which a knitting pattern is used with braids, twisted strands or other complex patterns;
- jacquard, in which a patterned fabric is knitted from threads of several colors.
A headdress made by any of the above methods can be supplemented with artificial fur trim. The edge of mink or other natural fur will make the hat even more attractive and warm.
Women's earflaps can be made in Scandinavian style
What to wear with
Thanks to this variety, the headdress can be successfully combined with a wide variety of clothing sets. If successfully combined with other wardrobe items, earflaps have every chance of becoming part of your unique style.
A knitted hat with earflaps for a girl will look good with a fur coat or coat, as well as with light raincoats. It can be worn with a short jacket, suede gloves, and a scarf created using the same technique. For shoes, fashionable embroidered felt boots or UGG boots are the most suitable, but you can wear any model with flat soles.
The headdress fits perfectly into a sporty and ethnic style. In the latter case, it can be worn with colorful skirts, leggings and capes with ornaments. For casual, you can use the option with decorative inserts, beads, pompoms, and ribbons. Models of knitted hats made in pastel colors will harmonize with light sweaters, fur vests, and black jeans.
A set knitted with the same pattern looks very advantageous
One layer for off-season
The hat was designed by the author Ekaterina (katika_handmade), for which many thanks to her. Make the work using thread in 3 folds + 2 stabilizing stitches. and circular knitting needles No. 5 and stocking needles No. 4.5. Cast on 76 stitches plus 1 connecting stitch, combine into a ring and knit 28 cm. Divide into four sectors of 19 stitches each and begin making the crown. To do this, before and after the marker, make decreases with an inclination towards the marked point. That is, in each decrease row. knitted fabric is decreased by 8 p. Perform such manipulations every second p. When there are few stitches left, it is more convenient to continue knitting on stocking stitches. We continue until there are 12 stitches left. We transfer them to the cut yarn and tighten them.
General recommendations
When starting to knit a hat with earflaps, you need to take into account some features and important details. The subtleties described in the article will eliminate the need to bandage the product due to mistakes.
Yarn selection
When creating a women's hat with earflaps, craftswomen often knit various relief patterns from twisted strands and braids to emphasize individuality. In such cases, it is not recommended to use contrastingly colored melange threads. Due to too sharp color transitions, the pattern will be “lost” and will be difficult to distinguish on the canvas.
Fleecy and boucle yarns are suitable for products made with simple stitches - garter stitch or stockinette stitch. They can also be used to make a visor and for edging.
As for the composition of the threads, a winter hat is knitted from mohair, merino or angora wool. For spring, our yarn should consist of cotton, silk and bamboo fiber. A small acrylic content will make the item more durable.
Fluffy threads will create a fur effect
Pattern and diagrams
There is a classic pattern for a hat with earflaps, but some differences from the standard pattern are possible. In any case, the required elements will be:
- main cloth of the headdress;
- ears;
- visor with lapel.
Ushanka hats for women are knitted from several parts.
The presented patterns demonstrate what the difference can be. The shape of the visor and ears usually undergo changes. For each option, there are specially selected patterns and knitting patterns with descriptions, following which you can make a headdress.
For a model with a complex pattern, a detailed knitting pattern will be required.
Before knitting a headdress, novice knitters are advised to draw a full-size pattern of the selected model. The canvas can be attached to the drawing during the work process. If errors were made during the calculations, this will allow the product to be corrected in time.
Taking measurements
The head is measured so that the measuring tape passes just above the eyebrow line. The depth of the product is determined by stretching a measuring tape from one earlobe to the other through the top of the head and dividing the resulting indicator in half. If you plan to add a lining to a girl’s earflap hat, it is recommended to add 3-5 cm to the measured height.
The width of each flap ear should be approximately 1/3 of the back of the headdress. The exact size can be found by dividing half the head circumference by 2, then by another 3 and adding 1-2 cm. In accordance with the obtained numbers, you can change the diagrams and the selected pattern.
To create a hat with earflaps for women, you need to know the circumference of the head and the depth of the product.
Calculation of loops using a test sample
You should not waste time knitting a 10x10 cm fragment. Moreover, if you choose the option with voluminous strands: they can significantly “eat up” the width of the product, making it narrower and denser.
By attaching a measuring tape to a test sample, you can calculate how many loops there are per 1 cm in width and height. Knowing these numbers, it will be easier to adjust the number of loops to the chosen model and check the pattern while knitting.
Ushanka for a girl can be made in accordance with any patterns
Video MK
Master class on knitting a downy hat with your own hands from mink with Aliexpress honeycomb pattern.
A charming option with small braids. Knitted hat in pumpkin style. Decorated with sequins - 33 pleasures. Children's hat hood with lining.
For the knitter: an incredibly beautiful and simple pattern. Delicate buds that can be used to knit a hat. Read more.
Downy lilac beret with calculation method for different sizes
Free description of the beret from @ olga_maksheeva
This is one of the best and clearest descriptions of a beret, which is knitted with a pearl pattern, or a rice pattern. The advantage of this description is that the method of counting loops and calculations for different sizes are given. This helps a lot if you haven’t knitted berets before and didn’t fall into the author’s knitting density.
