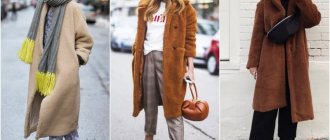
It's winter outside and it's time to think about how to update your winter clothing wardrobe. Not everyone has the opportunity to buy a new sheepskin coat or fur coat, but you can make something new with your own hands from old clothes. The main thing is to find an old sheepskin coat or fur coat, and your imagination and skill will replace your money.
In this article I offer one of the options that you can make from an old long sheepskin coat with your own hands. Provided that you already have experience working with fur or at least working with natural leather, suitable tools and a sewing machine such as Singer or PMZ.
To get such a short sheepskin coat, you will need to cut the bottom of the sheepskin coat by at least 30 cm, and better if it can be shortened by 40 cm. You will also need to buy a plate of genuine leather, a good metal zipper and sheepskin fur.
Now let's see how to recut a sheepskin coat, make a hood and perform other finishing work to turn an old women's sheepskin coat into an elegant new short sheepskin coat.
Faux sheepskin coat - sew according to the pattern!
Keep yourself warm and cozy in this short faux shearling coat!
Despite its apparent lightness, such a sheepskin coat will perfectly warm you in cold weather and protect you from the wind - after all, the collar of the model is tightly fastened with a durable zipper. The combination of 2 shades of sheepskin allows you to give this sheepskin coat a sporty chic, and the absence of a lining greatly simplifies the work. Combine such a sheepskin coat with a long, warm bell skirt, and you won’t mind any cold weather!
To open patterns in full size, open each in a new window.
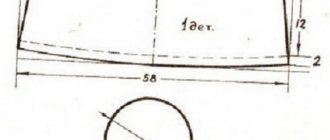
Sheepskin coat pattern - details
Rice. 1-2: Sheepskin coat pattern - front and back views
Sheepskin coat pattern - modeling
Rice. 3. Pattern of a sheepskin coat - modeling the front and back
On the front and back from the waist line, put 22 cm down on the sides. Along the middle line of the front, put 23 cm down. Draw new lines for the bottom of the front and back. Remove the waist darts on the front and back, narrow the back along the middle line at the waist by 1.5 cm, smoothly bringing the line to the neckline and bottom of the back.
Draw a dotted line to the armhole, cut along the line and one of the sides of the chest dart.
Draw a horizontal line along the back, at 1/2 of the armhole. Cut the back along the line and spread it apart as shown in Fig. 3 - by 1.5 cm. Lengthen the back shoulder by 1.5-2 cm and raise it by 0.8 cm. Draw a new armhole line.
Rice. 4. Pattern of a sheepskin coat - modeling the front and back yoke
Reduce the chest dart by moving the part (Fig. 4). Raise the front shoulder by 0.5 cm, draw a new armhole line.
ADVICE! If the armhole turns out to be too deep, it can be reduced by raising it on the side by 1.5 cm (see Fig. 4 - if necessary). You can change the back armhole in the same way.
Rice. 5. Pattern of a sheepskin coat - modeling the approach to the fastener of the front and sleeves
Model the yoke of the front and the approach to the fastener (see Fig. 5). Mark the pocket on the shelf.
Extend the sleeve by 8 cm - a lapel at the bottom of the sleeve. Cut the upper part of the sleeve, leaving 6 cm along the edge and drawing an inclined line. Make the angle of inclination as you wish.
Rice. 6. Pattern of a sheepskin coat - modeling a turn-down collar
Modeling a sheepskin coat collar
Determine the angle of the front lapel lapel (attach the pattern to the figure and bend the lapel). From the resulting point, draw a tangent to the neckline of the shelf - point L, let's denote the point of intersection with the shoulder as L1.
Measure 1/2 of the back neck according to the pattern and set aside the resulting value minus 0.5 cm in a straight line - you get segment L1L2.
From point L with radius LL2 draw an arc to the left. From point L2 to the left along an arc, lay L2 L3, 3 cm long.
Connect points L and L3 with a straight line. On the perpendicular from point L3 to straight line LL3, consistently set aside 3 cm and a departure width of 7 cm – point L4.
IMPORTANT! The width of the rise and the configuration of the collar can be changed based on your own preferences.
From point L4, draw a perpendicular to the segment L3L4 and set aside a segment 6 cm long. Set aside a segment equal to the width of the collar at the ends, approximately equal to or slightly less than the segment MM1 (usually M1M2 = MM1). The width of the collar at the ends and the shape of the collar as a whole should correspond to the chosen model.
Draw the line for sewing in the collar with a deflection from the middle of straight line LL3 by 0.2 cm. Draw the outer cut of the collar with a deflection from the middle of straight line L5M2 by 0.3 - 0.5 cm.
Re-cut the collar and cut it separately.
Sheepskin coat pattern - cut details
Rice. 7. Pattern of a sheepskin coat - cut details
For the sheepskin coat you will need:
Artificial sheepskin in 2 colors, 1.45 m wide and long:
- milk sheepskin - about 1.5 m (length of sheepskin coat according to measurement + sleeve length + collar width),
- beige sheepskin - about 0.5 m.
(!) To accurately calculate the required amount of fabric, lay the pattern out on the table and measure the required length of fabric.
You will also need one detachable zipper about 40 cm long and 2 permanent zippers 20 cm long, threads to match.
Cut out all the parts with a seam allowance of 1.5 cm, do not process the allowances(!). Additionally, cut out the facing of the bottom of the sheepskin coat with a width of 15 cm (in finished form 7.5 cm and a length equal to: back length + front length according to the pattern), 2 strips 2 cm wide in finished form for finishing the zipper.
How to sew a short sheepskin coat
On the yokes, cut off the fur according to the allowances, tuck the allowances of the front and back yokes, place them on the parts of the shelves and back, baste and stitch the yokes along the edge and at a distance of 0.75 cm from the first seam.
Make pockets with zippers on the shelves, having previously stitched rectangular parts from beige sheepskin (first cut off the fur on the parts completely).
On both sides of the shelf, carefully cut off the allowances along the fastener. Place the detachable zipper on the left shelf from the front side according to the markings and baste. On top of the braid, baste a finishing strip of beige color 2 cm wide, after first cutting off the sheepskin from it and folding the sections. Stitch the finishing strip to the front while stitching the zipper.
On the left shelf, baste the zipper in the same way, but stitch along the edge.
Sew side and shoulder seams. Sew all the details on the sleeves and topstitch. Sew the sleeve into the armholes.
Sew the collar into the neck according to the markings.
Stitch the flap along the bottom of the sheepskin coat, turn it to the front side and stitch along the front side - along the long and short sides.
From the remaining fabric, sew short belts about 4 cm wide and about 10 cm long - 2 for the bottom of the sheepskin coat and 1 for the collar, bevel the corners at 45 degrees. Punch blocks on the belts, sew along the markings (see Fig. 6) belts and buckles of suitable size.
Your sheepskin coat is ready! Wear it with pleasure and always be healthy!
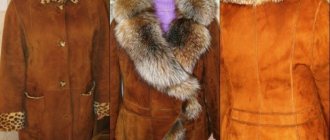
How to “refresh” the appearance of a sheepskin coat
It was a long and rather old sheepskin coat with a “short” collar. To refresh its appearance, I first had to take it to the dry cleaner, clean it and paint it there. All this is certainly not cheap, but a new sheepskin coat costs much more.
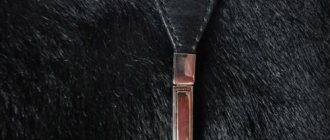
You will also need to buy a new layer of leather. Leather from unnecessary old things will not work; you need new and preferably patent leather, as in this photo. Visually shiny leather looks impressive on the matte surface of the sheepskin coat, and at the same time it “refreshes” well.
The shoulder seams are the most worn place (from the bag), so I had to make these leather overlays. Well, since the sheepskin coat was only shortened by 20 cm, the missing section of the hood had to be extended with leather. By the way, for a “full-fledged” hood pattern, you need to shorten your fur coat or sheepskin coat by 40 cm.
Is it possible to sew a faux fur sheepskin coat with your own hands?
Certainly. To do this, you need to have a sufficient amount of free time, have basic sewing skills and be able, at an elementary (simple) level, to handle fabrics and fur.
Taking measurements
The first thing the process of making a women's sheepskin coat by hand begins is taking measurements for future clothing.
If you have an old sheepskin coat that “fits” you comfortably, then instead of the sizes and pattern, you can use it, but if there is no such thing, then you need to:
- measure chest circumference;
- measure hip circumference;
- find out your waist circumference;
- specify the length of the sleeve (from the edge of the shoulder to the hands);
- - check your height.
All measurements can be taken using a regular (soft) sewing tape measure. It is recommended to record the results obtained in a separate notebook or draft, where they can be easily obtained as needed.
Women's sheepskin coat pattern
The pattern of a women's sheepskin coat consists of two “elements” - these are:
- pattern of the main coat;
- two-seam sleeve pattern.
In the end, it will be necessary to simply combine these two components.
On a note!
Knowing your measurements, you can use special computer programs to immediately get a ready-made pattern, but this may incur a small fee for using the Internet service.
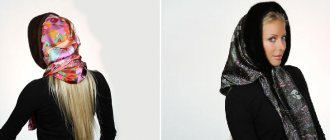
Also, if you want to sew a women's sheepskin coat with a hood by hand, then do not forget to measure the head circumference and add the hood pattern to the finished project (the hood pattern can be found on the Internet - these are standard patterns - just combine them, adding to each other, to your liking and desire).
Fur trim on the sleeves and bottom of the sheepskin coat
You can do without fur trim on the sleeves and bottom, but not in this case. Sheepskin fur here has not only a decorative purpose, but also a practical one. He increases the missing section of the sheepskin coat by 15cm. You can also use this technique, and the fur itself can be bought undyed. Firstly, it is cheaper, and secondly, it is difficult to find the right color and shade. Undyed fur can then be quite easily dyed yourself at home.
Well, so that your “tricks” are not noticeable on the inside of the sheepskin coat, cover this area with a lining in the color of the sheepskin coat’s fur.
After completely recutting an old sheepskin coat into a sheepskin coat with a hood, even a small area remained unused - the collar of the sheepskin coat.
In this video you will see how a furrier machine works. We sew together two small pieces of fur especially for you.
Sew a women's sheepskin coat: a step-by-step guide
To sew a women's sheepskin coat you need:
- Apply the projection of future elements from the pattern onto pre-prepared fabric.
To do this, you can use crayons or a sewing pencil (it washes off easily the first time you wash it). Tip: the pattern can be printed on sheets of A3 or A4 format, and then carry out the procedure for transferring the markings.
- Cut out all the elements and mark their joints.
- Manufacturing will begin with large elements of clothing: sew the base of the sheepskin coat, then proceed to the sleeves.
- The sleeves can be sewn into the finished product, after which they can be combined into one overall composition.
If the sleeves allow you to apply decorative elements after completing the above steps, feel free to leave this for later. Decorative elements may become dirty during sewing or damaged.
- This step is the final one and includes adding minor elements (pockets, space for a belt, etc.).
After this, you can add decorative seams, elements and fasteners, buttons.
What can you do about stretched and worn out pockets?
Split pockets are the “trouble” of any fur coat or sheepskin coat. Not only do they get worn out a lot, but they also stretch and sometimes tear. It is quite difficult to restore them; it is much easier to do it as shown in this photo. Moreover, extra accessories will only further decorate your short fur coat.
Video on how to sew a large button to a sheepskin coat.
Rules for working with faux fur
For best results, please read the following rules:
- Mark the front and back sides. It is necessary to clearly decide on the front side and adhere to this “path” while sewing. Don't get confused!
- It is necessary to cut the fur along the wrong side. This will help avoid cutting the artificial lint (near the cut sites).
- For cuts, use blades (secured in a special cutting holder) or knives (like a scalpel). If your back side is made of fabric materials, then you can use classic scissors.
As you can see, sewing a sheepskin coat with your own hands is not so difficult. Good luck in job!
Faux fur sheepskin coat Features of technology
Faux fur sheepskin coat Features of technology Our topic is faux fur sheepskin coat, since now in stores there are a lot of fabrics with imitation suede or leather, python and even with fur. In our studio we make a lot of these single-layer jackets and coats to order and therefore today we would like to introduce you to the technology of sewing from such fabrics.
Faux fur sheepskin coat
Why do I want to show you this, because it is very difficult to come to these technologies yourself. Therefore, today we will share with you the secrets of craftsmanship, so that you can quickly and correctly use such technologies so that your products are immediately beautifully executed.
Here is a jacket from the front and back, I would like to draw your attention to the finishing of the edges.
Processing the edge of the product Secrets of craftsmanship
In order to competently and beautifully process such an edge of the product, you need to cut off the fur by 0.8 cm along the entire edge of the product with scissors, then unscrew the fabric without fur and stitch it with a 2 mm stitch. But we must remember that this seam cannot be ironed! But to get a beautiful edge, we first steam the ironing pad and then apply it to the seam, but you can’t touch it with the iron, you’ll ruin everything.
We process the edge of the lapel of the collar and the edge of the side with a seam, but we do not process the edge along the bottom line of the collar, where the fur falls down. We do the same with the bottom edge of the product. We leave the pile unprocessed. We cut the fabric with a razor, while trying not to damage the pile. We process the edge of the sleeve in the same way.
Where there are seams, they are all ironed. The seam allowance is 1.0 cm, the fur is neatly cut, the fabric is stitched and steam-ironed.
pressed seams
On the front side, stitching is then done along these lines.
Processing the edge of the product Secrets of craftsmanship. Seam stitching from the front side
With this treatment, the seam is very soft, there are no thickenings. Even at the junction of such seams there are no seals. The neck line, the shoulder line, all seams are decorated with such a stitch, with the exception of the sleeve line.
The clasp is framed with loops. In order to make such a loop, you must first remove all the fur from this piece of fabric. This is what the framed loop looks like from the inside of the product.
designing a loop into a frame from the front and back of the product
The length of the sleeve can be adjusted by changing the width of the cuff; if it is cold, the fur can be turned away; the sleeve will become longer, but now it is fashionable to have fur turn-ups on the sleeves.
Sleeve length is adjustable by turning the fur outward
The model of this jacket is made according to the basic system of 10 measurements https://paukshte.ru/10_merok/ freedom of fit 3, back with reliefs, front with reliefs.
I showed you how to make reliefs in the video, you can watch the Two-seam sleeve https://www.youtube.com/watch?v=0wqIqjEdeTM The long-awaited pattern of the two-seam sleeve can be seen here https://paukshte.ru/10_merok/#rukav Notice how good it is The shape has a two-seam sleeve.
two-seam sleeve shape
Not everyone can afford a product made from natural fur and it’s not always necessary, sometimes for a change it’s very nice to have such a jacket made of such a fun fabric with faux fur!
Tips for calculating fabric consumption for such a product.
If the product has ribs, we always recommend buying fabric in two lengths of the product, since the store may offer to purchase fabric for the product based on one length of the product plus the length of the sleeve, but in this option you will not have enough solid fabric for the drapes and they will have to be made from pieces , but in our version, picking is not needed and therefore the fabric consumption is one length of the product plus the length of the sleeve.
From the part where the sleeves were cut out, the collar is perfectly cut out.
Our motto has not changed, be diverse and different from yourself every day.
All the best, we were with you, Irina Mikhailovna Paukshte and Alexey Yastrebov!