In addition to the fact that our atelier for sewing and repairing fur products produces jackets, coats and fur coats, the salon’s craftsmen are engaged in the production of headwear. But if you want to order a hat, then you need to come to our salon any Sunday from 12.00 to 16.00. And if you want to order a hat sewing in the summer, then you should make an appointment with the master on Saturday by calling 430-64-29. Also in our salon you can store your fur coat in the summer so as not to spoil its appearance.
What furs are used to make hats?
We offer tailoring of hats from the customer's fur, or the client can choose the material from what we offer. You will be able to choose for yourself Russian and Scandinavian-made textures of different shades and styles.
Sewing fur hats to order in our salon is carried out from different materials. Most often we use the fur of such animals:
- marten;
- sable;
- sheepskin;
- raccoon;
- astrakhan;
- beaver;
- seal;
- rabbit;
- fox;
- broadtail;
- ferret;
- arctic fox;
- silver fox.
In addition to sewing custom hats in St. Petersburg, our studio offers repairs and styling of existing hats, berets and other outerwear. We also offer our clients fur dry cleaning in St. Petersburg.
What kind of fur is best to make a hat from?
When choosing fur, your financial capabilities and, of course, taste come first. When choosing fur for a hat, you should pay attention that the hat is worn with a coat or fur coat, respectively, they must be combined.
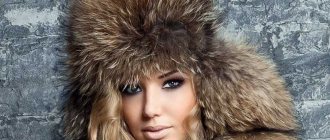
Below you can see a photo of a fur hat made by our subscribers.
Cost of fur hats
The cost of hats is determined individually and depends on the type of product, size, type of material and complexity of the order. If you need urgent production of a beret, cap or hat for the winter, the price of the product will increase by 50%. The readiness of such an order is estimated in one day.
The price for sewing fur hats in St. Petersburg is determined by the category of material:
- A. Raccoon, mink, seal, otter, arctic fox, astrakhan fur, fox, muskrat, polecat.
- B. Marmot, rabbit, sheepskin, cat.
- V. Chinchilla, sable, broadtail, marten, ermine.
Our website contains current prices excluding the cost of materials. offers one of the competitive prices for products in St. Petersburg. Our specialists have completed hundreds of orders during their work, and therefore will be able to realize any of your fantasies.
LiveInternetLiveInternet
Pattern of a women's classic fur hat
Home » Hats and Caps » Pattern of a women's classic fur hat
Sewing from fur is very simple, and today I propose to create a pattern for a women's fur hat so that you can sew your own fur hat. When creating this pattern, I wanted to have a fox hat like Nadya Sheveleva’s from the famous film “The Irony of Fate or...” But after making the pattern and trying it on, I decided I wanted a rounder shape.
To construct, you need to measure the circumference of the head and the approximate height of the hat. My head size is 54 cm and the height of the hat is 15 cm. If you want a hat with 4 wedges, then divide this size by 8, if there are 6 wedges, then by 12. So in the photo there is a pattern for 4 wedges and for a round-shaped hat, with lining and insulation. But you need your own pattern and therefore in order: glue two sheets of A 4, build a pattern from one edge. For example, a pattern for size 56. Divide 56 by 8 = 7 cm. The base at the bottom is 7 cm, the height of the hat is from 12 to 17 cm for fox fur. Take into account the height of the fur, a hat that is too high will not decorate a petite girl, 15 cm was enough for me. 15 cm for the crown of the hat, 4 cm for the bottom. The curvature of the wedge depends on the shape of the cap, the lower and softer it is, the more rounded the cap, the higher and steeper, the higher the crown of the cap and you will get a sample of Nadya Sheveleva, but this is for 6 more wedges.
Now fold the pattern like an accordion with 7 cm edges to get the intended number of wedges. Don't rush to cut out the pattern.
Leave these scallops so that you can make a pattern and try it on. Next, connect the pattern into a ring using tape or leaving an overlap.
Try it on a blank or on yourself. Step back a meter and a half, evaluate the height and shape. Make changes to the pattern and try it on again. If you like everything, then it’s time to start making the pattern, taking into account the freedom of fit, otherwise the hat will simply be too small. Cut out one wedge fragment for further construction. Calculation: if you want to have a hat with a batting lining, then to the thickness of the batting, mine is 0.8 cm plus 1.2 cm for the fur hem and plus 0.6 mm for the lining, we multiply all this by 2 and get an increase in the freedom of fit, I got it 5.2. My hat fits on my head like a glove and doesn’t fall off or weigh on me.
Add this increase to the head circumference 56+5.2=61.2 cm. 61.2/8=7.65, round to 7.6. Draw the final pattern on a new sheet of paper. From the bottom border of the sheet, retreat 1.5 and draw a line - this is the hem allowance, from the right edge of the sheet a parallel line with a width of 7.6 cm. And first attach the previously cut wedge fragment to the right side of the sheet, circle halfway
and to the left, also circle to half. Remove the wedge and connect the line of the new wedge. Fold again like an accordion, give a seam allowance to the wedge pattern line of 0.4 cm and cut out the final pattern.
Place marks at the bottom for the hem and 2-3 marks along the wedge pattern line. The pattern for a women's fur hat is ready.
Fur Post Series:
Part 1 - Faux Fur. Recommendations for cutting and sewing. Part 2 - Without a title... Part 12 - The main seam of a furrier for sewing fur (master class) Part 13 - How to sew a hat from fox fur Part 14 - Pattern of a women's classic fur hat Part 15 - Shortening a fur coat Part 16 - Working with leather, suede , fur... Part 24 - FUR HEADWEAR (1). Part 25 - FUR HEADS (2). Part 26 - We sew fur mittens with a gusset at the finger. Pattern + MK
Sewing women's hats
| A | B | IN | |
| Beret, ball, kubanka | 4 000 | 2 670 | 6 670 |
| Beret, ball, kubanka with decorations | 4 670 | 3 400 | 7 340 |
| Kepi, ball with visor | 4 670 | 3 400 | 7 340 |
| Fur helmet (pilot) with ears and visor | 5 340 | 4 000 | 8 000 |
| Boyarka (GU with leather/suede) | 5 000 | 3 670 | 7 670 |
| Hat with brim | 5 340 | 4 000 | 8 000 |
| Helmet with leather/suede | 5 000 | 3 670 | 7 670 |
| Headband | 3 340 | 3 340 | 5 000 |
| Particularly complex decoration | 800 | 700 | 1 000 |
DIY fur hat: tablet model
Interested in the question of how to sew a fur hat with your own hands, but don’t know which model to choose? The best old proven method is trying on. Go to the store and try on hats, just 20-30 minutes and you will decide which model suits you.
But there is also a win-win option - a tablet fur hat. This model suits absolutely everyone, the main thing is to decide on the color, height and pomp of the hat. Well, we’ll tell you how to sew such a fur hat with your own hands.
To work we will need:
- A sheet of paper for a pattern, a pencil and a ruler;
- A measuring tape if you don’t know the exact volume of your head;
- Fur;
- Lining fabric;
- Stationery knife or blade;
- Pen;
- Needle and strong thread No. 40;
- Sewing machine.
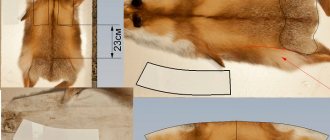
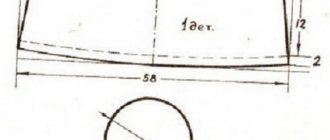
So, let's start by creating a pattern. As an example, we provide a photo of the pattern, but only as a sample to work with.
DIY fur pill hat pattern
- Draw a rectangle 58 cm (head volume can be from 48 (for children) to 60) in length and from 10 cm to 14 in height, depending on the size of the hat, in our case 12 cm;
- On the left and right along the bottom of the rectangle, as shown in the photo, we put 2 cm along vertical lines (standard for all sizes), and draw a smooth line to the bottom. The result is a straight line with rounded ends;
- In the middle we lay a dotted vertical line with a dotted line. From top to bottom along this line we set aside 1.5 cm (standard for all sizes);
- At the top we set aside 2 cm (standard for all sizes) on the right and left, but along horizontal lines and from the middle, where the -1.5 cm point is placed, we draw lines to the edges;
- You should end up with a figure like the one in the sample photo.
- Draw a circle with a perimeter equal to the perimeter of the top of the pattern. In our case, this is a diameter of 16. The standard formula for finding this value is p=π d;
- We cut out the pattern from paper, apply it to the flesh and outline it with a pen. Don't forget to add 0.5 cm to the allowances;
- For cutting, you will need a T-shaped razor blade or a sharp stationery knife, you can also use a scalpel.
- We make a small incision (a couple of millimeters) and, lifting the fur, carefully cut the flesh. Ideally, cut only along the flesh, without even touching the down. In this case, the loss of valuable fur will be minimal, and you will not have cut pile and tabletop;
- Now we do the cutting on the lining;
- Fold the long part of the lining in half, baste it, sew it on a machine, apply a round bottom, baste it and sew it on a machine, process the edges;
- We fold it according to the same principle, but this time with fur, make sure that the fur does not stick out on the wrong side, if necessary we correct it and sew it with a furrier’s seam;
- We attach the bottom and also stitch it;
- We turn the hat inside out and check the quality of the seam; if there are any shortcomings somewhere, we rip the seam and stitch it again. We check until everything is fine. But if you don’t stretch or tighten the skin, you’ll most likely sew it well the first time;
- Now turn it inside out again and insert the lining. On the wrong side, we grab the lining in several places with a thread so that it fits perfectly in the hat, and then sew a hidden seam along the edge so that the edges of the lining and the inner part are hidden under the seam;
- All that remains is to comb your hair, try it on and go for a walk.
Mink tablet hat
Sewing men's hats
| A | B | IN |
| Cap | 5 000 | 5 970 |
| Fur helmet (pilot) with ears and visor | 5 500 | 6 570 |
| Helmet (pilot) with leather/suede | 5 500 | 6 570 |
| Gogol (pie) | 4 670 | 5 580 |
| Moscow | 5 350 | 6 390 |
| Boyarka with leather/suede | 5 350 | 6 390 |
| Ushanka classic | 6 700 | 8 000 |
Repair of hats
| Installation/replacement of lining (viscose) (including lining) | 750 |
| Installing/replacing quilted lining (including lining) | 900 |
| Ripping | 150 |
| Size reduction 0.5 cm without lining spacer | 400 |
| Reduce size by 1 cm or more with lining spacer | 700 |
| Increase in size without lining spacer (el for.) | 500 |
| Replacing tires. cord | 590 |
| Making trim on the headdress | 500 |
| Complex finishing | 800 |
| Making 2 pom-poms | 400 |
| Sew ear ties | 300 |
| Sew on the tail | 450 |
| Consultation | 200 |
| Elastic cord | 150 rub/m |
| Lining (viscose) | 200 RUR |
| Sheet lining | 250 |
Extra charge for urgency (repair - 1 day, sewing - days) +50%
You can find out more details by phone. 430-64-29 or mob. 920-02-60 For work not included in the price list - price is negotiable
Prices do not include fur, leather, suede.
Step-by-step instruction
- Pin the wrong side of the skin with pins. Trace with chalk and leave about 2cm of seam space.
- Then cut out the pieces with a razor blade.
- We do the same for the lining material.
- Sew fur and lining with wrong sides facing each other.
- Connect the circle and the rectangle on the wrong side.
- Machine stitch with each other 1 cm from the edge.
- Pin together the fur and lining.
- The fur blank and lining are stitched on a machine and turned inside out
Why is it better to order a custom-made headdress?
If you cannot choose a hat to match your fur coat in the store, then the right solution would be to use the service of an atelier and have it made to order. The main advantage of this service is that you can create for yourself not only a beautiful, but also a comfortable hat, cap or beret exactly in size. You can also choose the style and fur you like and add any accessories to the model.
Another advantage of ordering headwear from our studio is the reasonable price, since we purchase furs in bulk, and therefore can set a competitive price for our services. You can be confident in the quality of the finished product, as we use only the best materials.
If you compare store-bought hats and those made to order, the latter are made of much better quality. You will not find protruding seams, crooked stitches, or frayed material.
Mink hat
A hat made from fur strips is sewn with your own hands using the usual knitting technique, with the only difference being that thin strips of mink are tied onto the main yarn.
First, get your fur in good condition. The skin must be cleaned and any remaining glue removed, as well as combed. Next, you should cut the skin into pieces, initially mark out the cut locations on it.
When choosing the size of the strips, just make sure that they are the same size. The fur should be cut with a well-sharpened object in weight.
The next step is the wool lining. Needlewomen, be sure to knit the base from wool yarn. To knit, find out all the elastic patterns and holes.Crochet double crochets with chain stitches between them. Make the holes thick enough to allow fur to fit through.
Next you need to make the lining. We make a pattern to fit your head. We sew the lining. We cut holes at the same distance along the width of the fur strips. We insert fur strips into the holes and secure them inside with thread and a needle.
What kind of headdress can be sewn in our studio?
Our studio employs real professionals. Therefore, they will sew headdresses of any complexity. You can bring a sketch you like or create a new one together with the artist. You can order the following types of hats in our salon:
- a cap;
- hat;
- helmet;
- cap;
- bandage;
- beret;
- Kubanka;
- earflaps;
- Gogol.
Our specialists can sew a custom-made women's or men's headdress of any size. The sewing time depends on the complexity of the work; it can be from several days to weeks.
DIY fur hat: choosing material for the product
Do you want to sew a fur hat with your own hands? First, let's choose fur so that the finished product can be worn for a long time and please the owner.
- Matte or shiny. If you have a matte piece of fur in front of you, then no matter what you do, it will not add shine. There are types of fur that are initially matte, such as matte mouton, llama, sheepskin, etc., but we perceive most fur exclusively with shine and gloss. Therefore, no matter how thick the fur is, if it is dull and matte (not counting those listed above), it is better not to use it for a hat;
- Fur condition. Rub the skin, run a damp hand over it, and lightly comb with a round-tooth comb. If the fur sheds, it will quickly lose its appearance and shape. It is better to take fur for work, the hairs and down of which are dense and hold well in place;
- Mezdra. This is the base, the reverse side and the very skin on which the hairs and edges are held. It should be elastic, elastic and not crack when bent. You should not use fur with damaged flesh.
In order to sew a fur hat, you may need one or several types and shades of fur. It all depends on your preferences. You will also need a sewing machine or a gypsy needle for hand stitching, a lining for a hat and other materials.
To work with leather and fur, you definitely need to master the furrier's stitch; it is not difficult, and you can learn right away from the product. You can learn the nuances by watching the short video below.
